Webhook Configuration
Deploy the Personalized Docs Webhook in your Enterprise Group dashboard so that you can surface your developers’ API keys, server variables, and more across your hub!
Keep Reading if You're an Enterprise Customer 👀If you’re looking to set up the Personalized Docs Webhook for your Enterprise Group, you’re in the right place! If you’re looking to enable the Personalized Docs Webhook and are a free, startup, or business plan customer, head to this doc 😉
Personalizing the onboarding experience for new API users goes a long way toward helping them build quickly and making your API feel user-friendly overall. That’s why ReadMe’s Personalized Docs functionality allows you to surface custom data for logged-in users (like API keys, server variables, and more), so they can be successful with your API even faster. 🚀
Using the Personalized Docs Webhook, let users select their actual API keys in the Try It playground to make authenticated API requests immediately 👍
To take advantage of onboarding pages like Getting Started and Authentication or to surface API keys throughout your hub, you’ll need to configure the Personalized Docs Webhook. For ReadMe Enterprise customers, this happens in your Enterprise Group dashboard. You can further customize user data variables for each child project in your Group in the dashboards for those projects.
How to Personalize with the Personalized Docs Webhook
To personalize docs with information about the logged in user, ReadMe will make a request to your Personalized Docs Webhook, which is an endpoint that will need to be set up within an application that has secure access to user data. This endpoint will receive POST requests from ReadMe any time a user logs in, and will need to return a JSON object with information about the user, which will then be surfaced in the documentation.
You will configure this endpoint on the Personalized Docs page of your Enterprise Group dashboard:
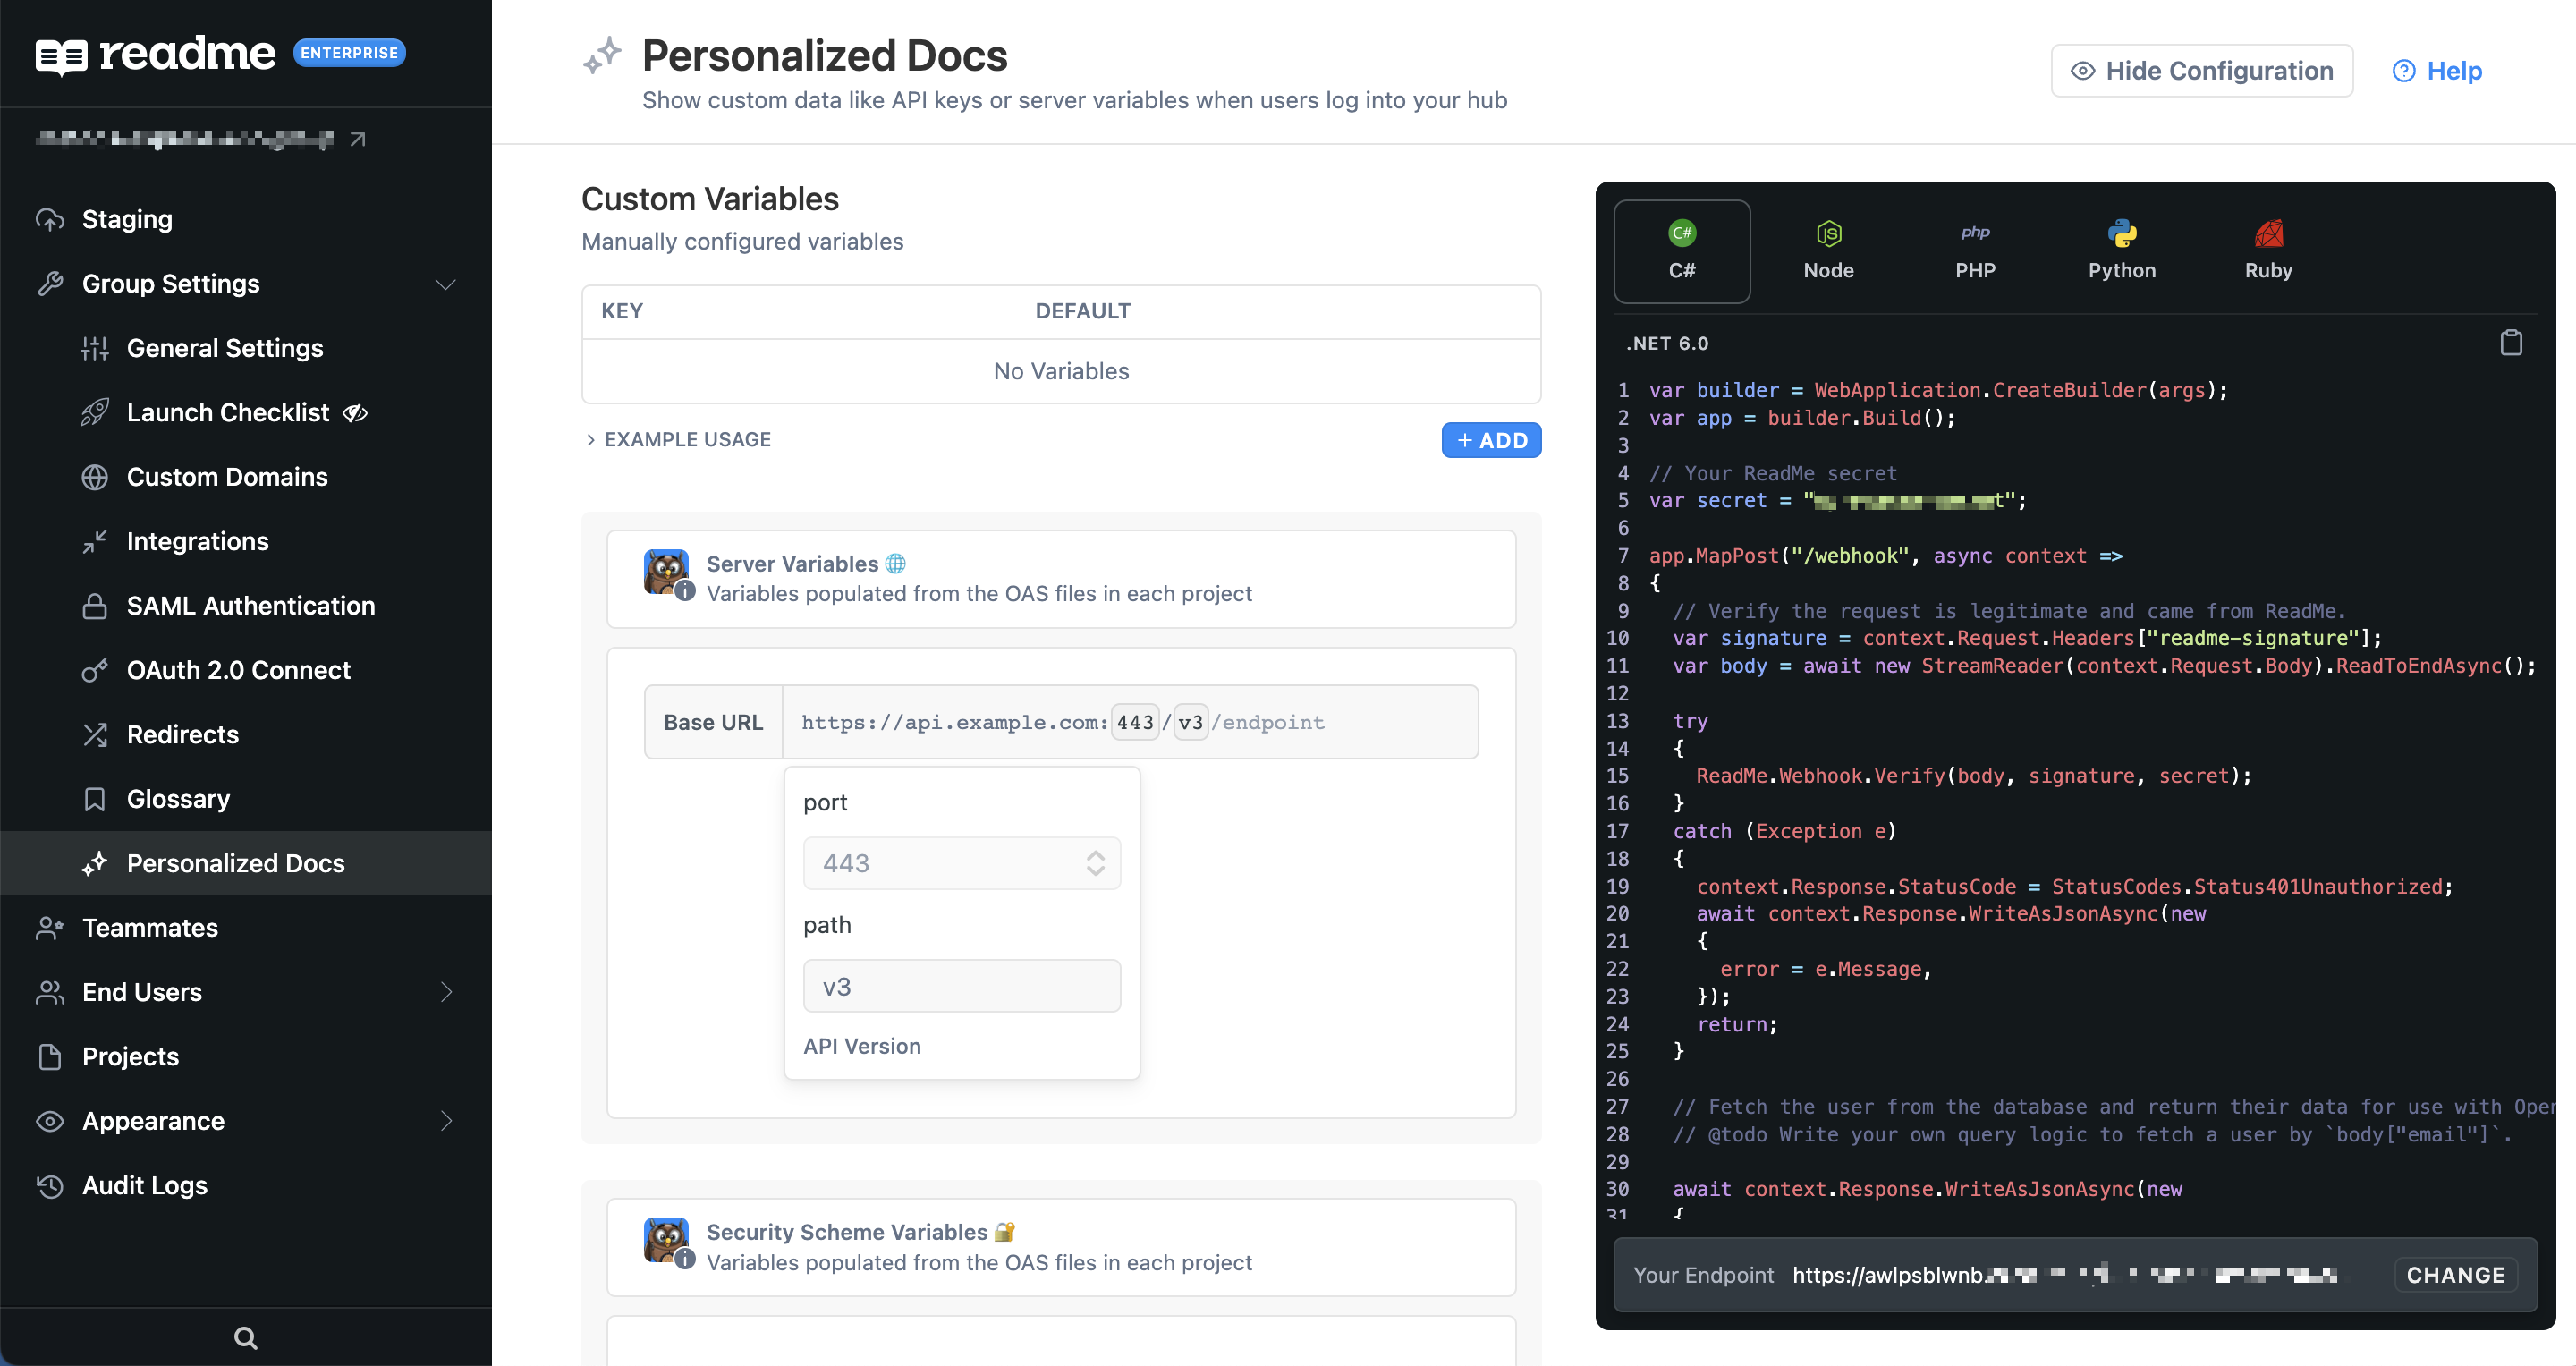
In the view above, the Personalized Docs Webhook has already been configured and deployed.
Your Developers Need to Be Logged in to See a Personalized ExperienceThe personalized docs experience is only available to logged-in developers of your hub. To learn more about ReadMe’s various login options, head to this doc.
There are 3 main steps to getting this set up that we will walk through in more detail:
- Create an API endpoint that ReadMe will make a
POSTrequest to (i.e., a Personalized Docs Webhook) - Verify the request signature to ensure that it's a secure request from ReadMe
- Fetch data for the user and send it back to ReadMe
We also have a video walkthrough of this process below:
In the video above, Kanad, our Developer Advocate, is using the non-Enterprise version of the Personalized Docs page but the setup flow for the Personalized Docs Webhook is the same.
1. Create a Personalized Docs Webhook
ReadMe will make a POST request to your Personalized Docs Webhook. This is an endpoint that you configure in your project dashboard. This endpoint should bypass any standard authentication that you may have set up and should be able to accept requests from dash.readme.com. We will send the email of the user that logged in as JSON in the request body.
Example HTTP Request from ReadMe
POST /webhook HTTP/1.1
Content-Type: application/json
Host: yourapi.com
User-Agent: ReadMe
ReadMe-Signature: example-signature (see step 2)

{
  "email": "[email protected]"
}
2. Verify the Request Signature
It's important to make sure all requests to this endpoint are coming from ReadMe so you're not sending sensitive user data to a bad actor. All requests from ReadMe have a signature header that can be used to make sure the request originated with ReadMe and wasn't modified in transit. We have packages in several major languages verify this header is valid.
Secret KeyYou can find your project's secret key on the "Personalized Docs" setting page in your project's group.
// Verify the request signature to ensure it came from ReadMe.
const signature = req.headers['readme-signature'];
// Your project's secret key
const secret = 'JWTSECRET';

try {
  readme.verifyWebhook(req.body, signature, secret);
} catch (e) {
  // Handle invalid requests
  return res.status(401).json({ error: e.message });
}

// All good! Continue to the next step
// Verify the request signature to ensure it came from ReadMe.
$signature = $request->headers->get('readme-signature', '');
// Your project's secret key
$secret = 'JWTSECRET';
try {
\ReadMe\Webhooks::verify($request->input(), $signature, $secret);
} catch (\Exception $e) {
// Handle invalid requests
return response()->json([
'error' => $e->getMessage()
], 401);
}
// All good! Continue to next step# Verify the request signature to ensure it came from ReadMe.
signature = request.headers.get("readme-signature", None)
# Your project's secret key
secret = 'JWTSECRET'
try:
VerifyWebhook(request.get_json(), signature, secret)
except Exception as error:
return (
{"error": str(error)},
401,
{"Content-Type": "application/json; charset=utf-8"},
)
# All good! Continue to next step// Verify the request signature to ensure it came from ReadMe.
var signature = context.Request.Headers["readme-signature"];
var body = await new StreamReader(context.Request.Body).ReadToEndAsync();
var secret = "JWTSECRET"
try
{
ReadMe.Webhook.Verify(body, signature, secret);
}
catch (Exception e)
{
context.Response.StatusCode = StatusCodes.Status401Unauthorized;
await context.Response.WriteAsJsonAsync(new
{
error = e.Message,
});
return;
}
// All good! Continue to next stepIf the call to verifyWebhook succeeds then the request is verified, you can safely return any user data needed.
3. Fetch User and Respond With JSON
Once the request is verified to be from ReadMe, the next step is to fetch the necessary data for the user that has logged in. This step is going to vary depending on what your API looks like and how your data is stored. ReadMe will send the logged in user's email address in the POST body, which can be used to fetch the user's information from the database (or wherever their API key and other necessary info is stored).
The general flow will be as follows:
- Get email address from
requestBody.email(the specific way to access the email will vary depending on your server framework) - Fetch user from your database/backend
- Return user data as JSON. These values should match the names in the API Specification. You can find a full reference of everything we expect here. Example of common pieces of data that are good to return:
- API key or any required API authentication
- Server information (customer specific URL, subdomain, etc)
// Fetch the user from the database and return their data for use with OpenAPI variables.
const user = await db.find({ email: req.body.email })
return res.json({
  // Add custom data to return in your webhook call here.
  apiKey: user.apiKey,
  subdomain: user.apiSubdomain,
});
// Fetch the user from the database and return their data for use with OpenAPI variables.
$user = DB::table('users')->where('email', $request->input('email'))->limit(1)->get();
return response()->json([
// Add custom data to return in your webhook call here.
'apiKey' => $user->apiKey,
'subdomain' => $user->apiSubdomain,
]);# Fetch the user from the database and return their data for use with OpenAPI variables.
user = User.objects.get(email__exact=request.values.get("email"))
return (
{
# Add custom data to return in your webhook call here.
"apiKey": user.apiKey,
"subdomain": user.apiSubdomain
},
200,
{"Content-Type": "application/json; charset=utf-8"},
) // Fetch the user from the database and return their data for use with OpenAPI variables.
// @todo Write your own query logic to fetch a user by `body["email"]`.
await context.Response.WriteAsJsonAsync(new
{
// Add custom data to return in your webhook call here.
apiKey = "api123",
});Setting Group-Level Variables
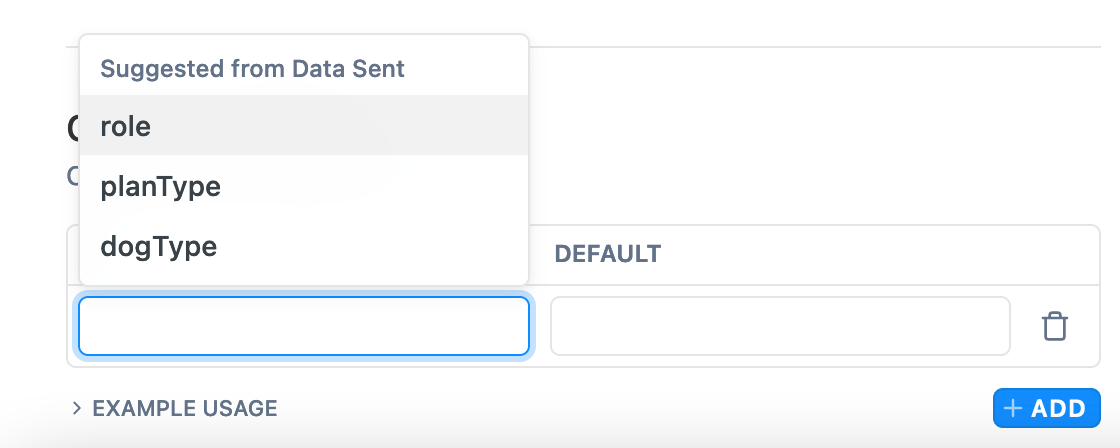
The new Personalized Docs page in your Enterprise Group dashboard also includes a section to add Custom Variables, which are manually configured variables. For example, if there’s any piece of data that’s required to use your product, such as version, plan type, or permission level, you can pass it into the user data payload and subsequently render that data in your documentation.
Custom variables added in this page will apply to all related child projects. During the webhook setup flow, any custom variables added in the code snippet will be added as Custom Variables automatically. You can also add additional Custom Variables using the “+ADD” overflow menu ⬇️
Setting Project-Level Variables
Along with the Personalized Docs page at the Enterprise Group level, each child-level project also has a Personalized Docs settings page in the Configuration section of its project dashboard:
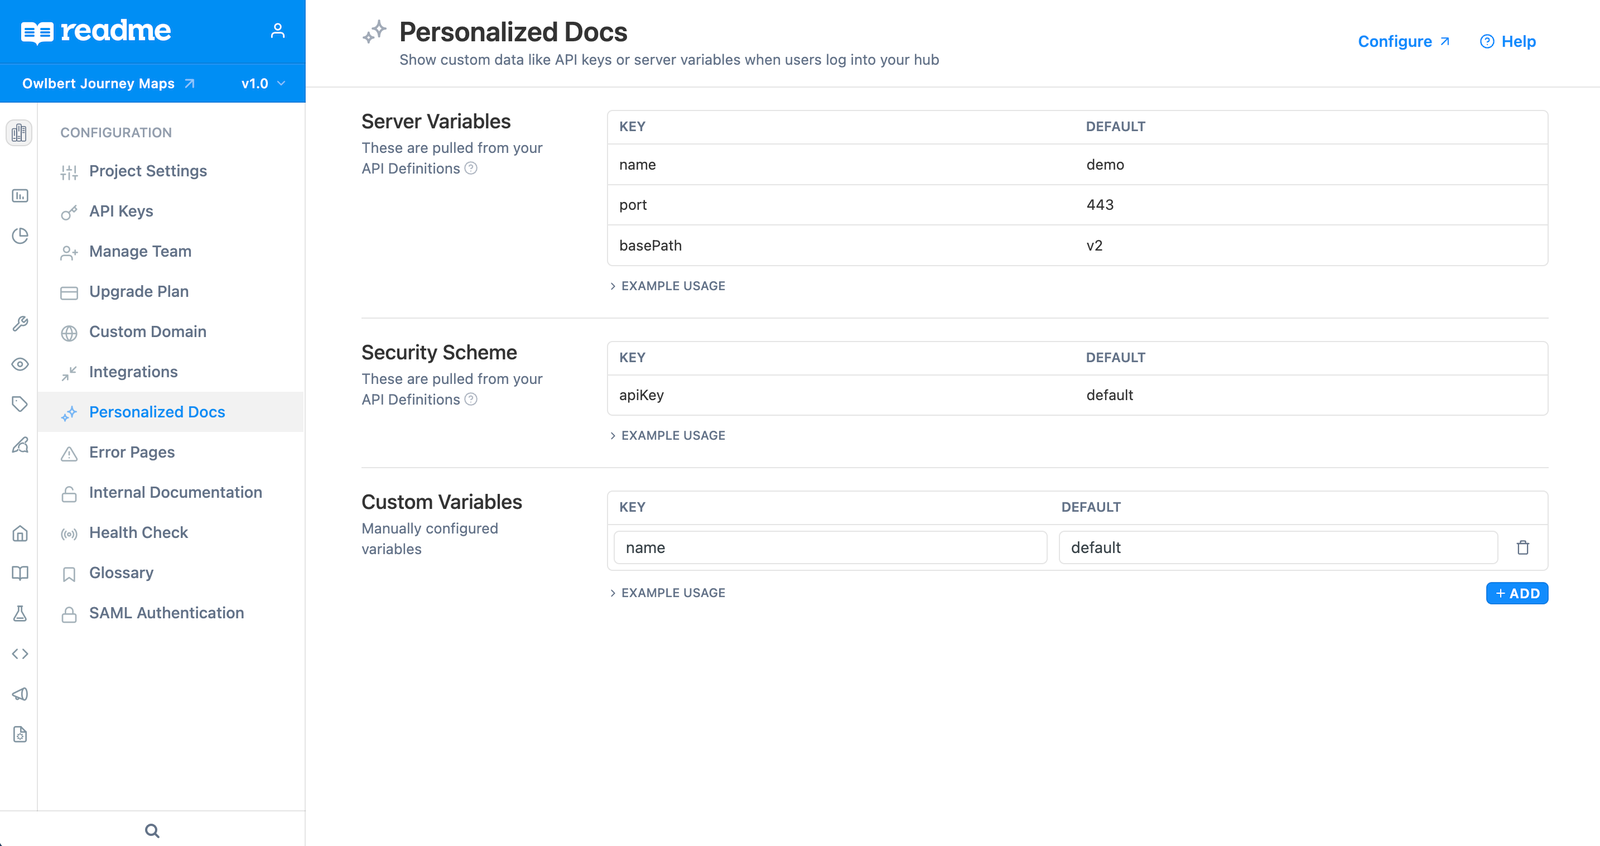
This page lists any Server Variables and Security Scheme variables automatically pulled from info defined in uploaded API Definitions. These are ready to use in your documentation once they appear in your Personalized Docs page. You can learn more about server and security scheme variables here.
There’s also a section to add any manually configured Custom Variables. Custom variables added to this page will only be reflected in Guides, Reference, etc pages that are specifically related to this project. If you have a duplicate Custom Variable(s), e.g., version, at both the child project and parent Enterprise Group levels, the Custom Variable at the child project level will override the Enterprise Group one.
Only Enterprise Group Admins Will See the Configure Button!Only Group Admins who have access to the parent Group dashboard will see the Configure button in the top right of this page. Clicking that button will take them to the Personalized Docs page in their Enterprise Group dashboard.
Enabling Your Getting Started & Authentication Pages
For more information on using the Personalized Docs Webhook to set up the Getting Started and Authentication pages for your child projects, check out this page. 🏁
You’ll Need to Promote These Changes if You Have Staging Enabled! 🎭If you have Staging enabled for your Enterprise Group, you’ll need to promote the changes for your Group in order to fully complete the Personalized Docs Webhook deployment 👍
Updated about 1 month ago