
Using Amazon API Gateway with the Personalized Docs Webhook
Don't use Amazon API Gateway?This document describes the Personalized Docs Webhook setup process for Amazon API Gateway customers. If you deploy your API or provision your users’ API keys through other means, check out our standard Personalized Docs Webhook setup guidance.
As previously described, you can customize your users' experience in your docs via the Personalized Docs Webhook. ReadMe’s Personalized Docs functionality allows you to surface custom data for your logged-in users (e.g., API keys, server variables, and more), so they can be successful with your API even faster.
By deploying the Personalized Docs Webhook, your developers will be able to quickly locate and toggle between their API keys across the API endpoint pages in your developer hub and, thanks to the power of Amazon API Gateway, you'll also be able to automatically provision API keys for new users.
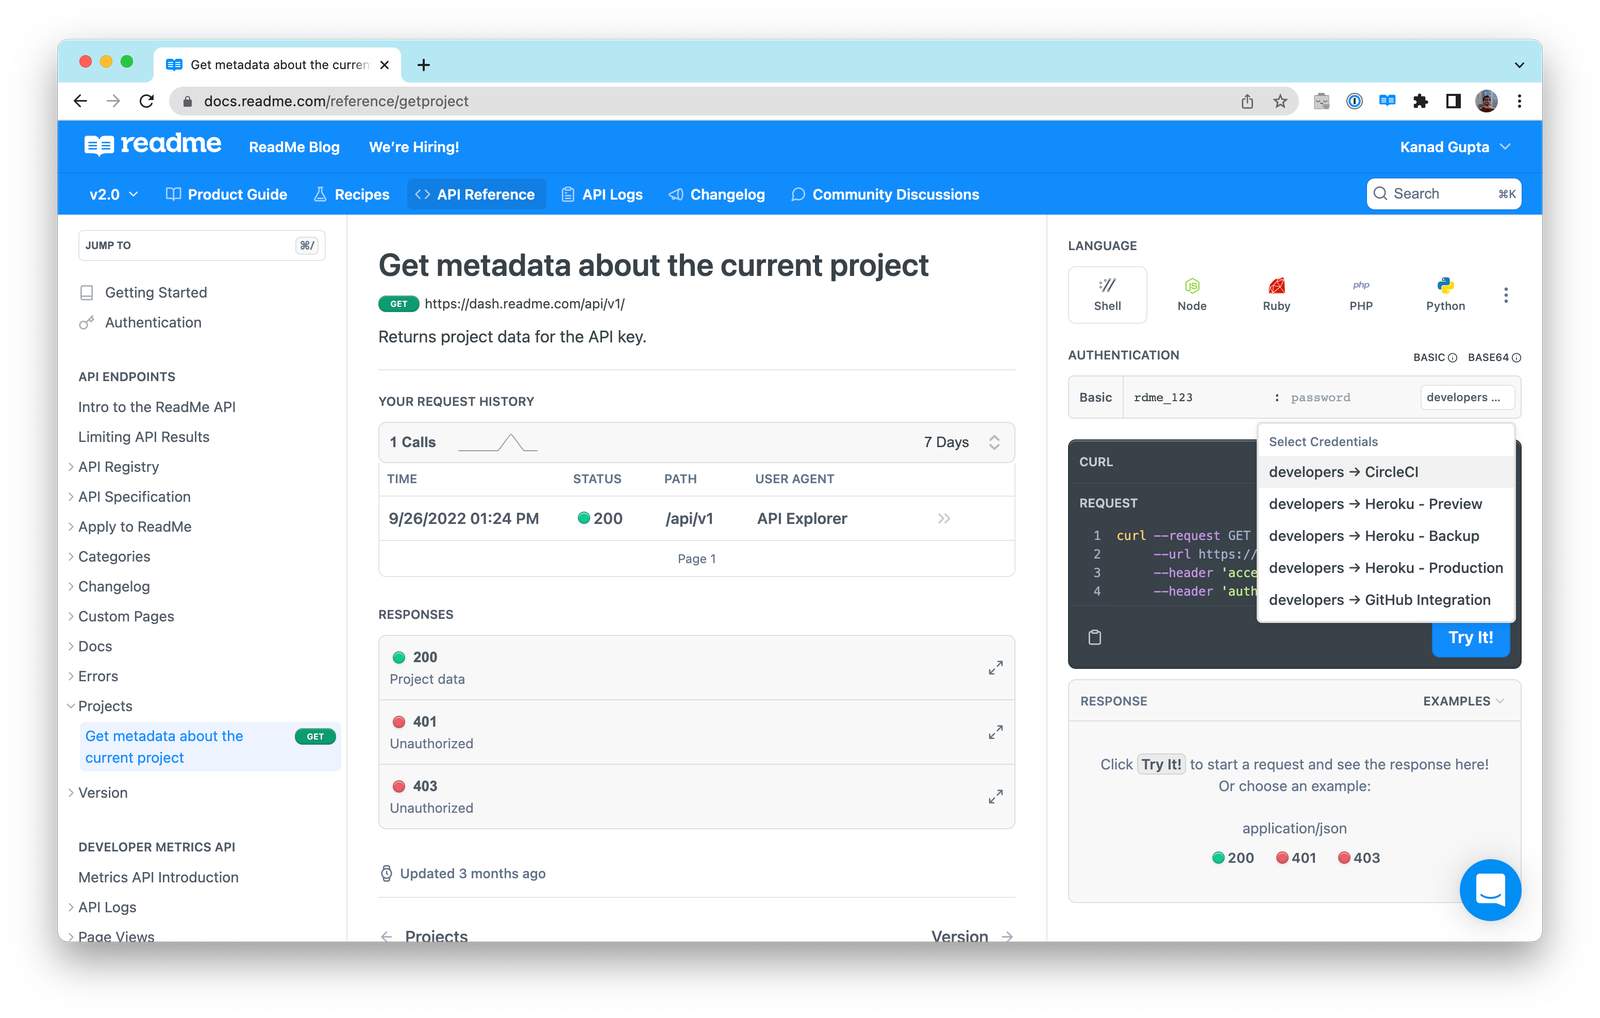
Additionally, once you deploy the Personalized Docs Webhook, you can move on to setting up the Getting Started and Authentication pages in your hub which will allow your logged-in developers to conveniently see the authentication credentials for all of their available API keys from the comfort of your hub. Using the Try It playground in these top pages of your hub, they’re able to make an authenticated request, and instantly see a response, with their real API keys.
If you plan on using AWS Lambda to deploy your webhook and if you already use Amazon API Gateway to manage API credentials for your users, we have dedicated code samples for you below!
Getting Started
To get started, head to dash.readme.com and navigate to your project. Under Configuration > Personalized Docs in your project dashboard, select the Amazon API Gateway code sample on the right. You'll see a number of different programming languages and AWS Lambda runtimes.
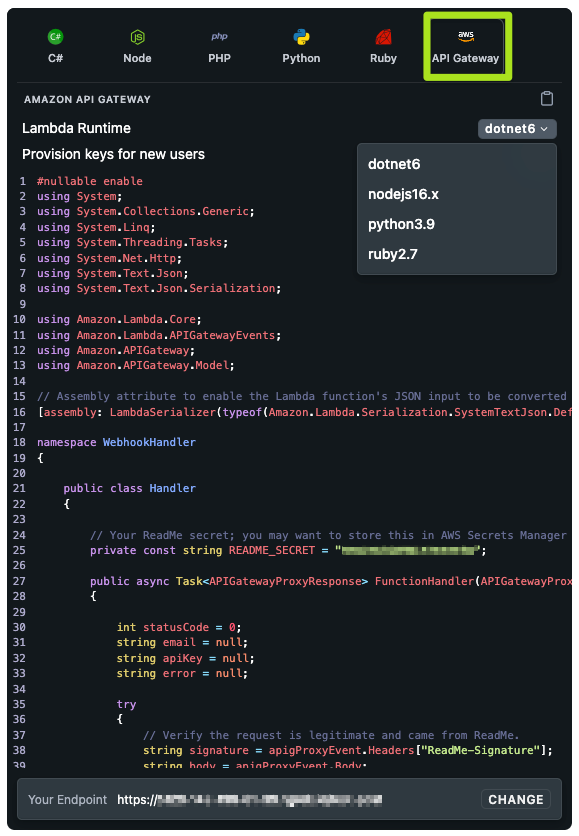
Here's an overview of what each code sample does:
- Validates the signature on the incoming webhook request to ensure that it's coming from ReadMe
- Automatically looks up the user by their email address, which is contained in the request payload
- If matching API credentials are found in your API Gateway data, they are sent as a JSON response to ReadMe's webhook request. The credentials will be surfaced on the Authentication page, as well as on any endpoint page in the API Reference so they can make authenticated API requests in a snap
Have a new user who hasn't used your API before? No problem! You can automatically provision new API keys in your API Gateway, so that anybody can try your API from the API Explorer, even if they haven't signed up for anything directly in your service yet. Enable the “Provision keys for new users” toggle to add that logic to the code sample.
Follow the steps below to add the Personalized Docs Webhook endpoint to your API
Install the Required Libraries in your Application
To use these code samples, your project will need a copy of the ReadMe SDK along with the compatible AWS SDK for your programming language. Here are the shell commands to install libraries in each supported language:
dotnet add package ReadMe.Metrics
dotnet add package AWSSDK.APIGateway
npm install --save readmeio
npm install --save @aws-sdk/client-api-gatewaypip install readme-metrics
pip install boto3gem "readme-metrics"
gem "aws-sdk"Copy the Code Sample to Your Project
The code sample is a self-contained Lambda function which should live in its own file in your codebase.
The code sample contains a constant called
README_SECRETwhich is the signing secret for your ReadMe project. We recommend storing the secret in AWS Secrets Manager and loading it at runtime, as opposed to leaving this directly in the source code. If you're not able to use AWS Secrets Manager, you can also move it to an environment variable in your project.
If you've chosen to provision keys for new users, the code sample will include a second constant,
DEFAULT_USAGE_PLAN_ID. This usage plan will be attached to all new API tokens created by this webhook. You'll need to replace this with a valid usage plan ID in your API Gateway configuration, which you can find from the API Gateway console. If you want to change this behavior, you'll need to customize the code in the webhook. This ID does not need to be secret, so it's safe to leave in the source code file.
Configure an API Gateway Endpoint for the Webhook
The exact steps to configure this Lambda function depend on the framework you're using to manage your API Gateway service:
- If you're using the AWS Cloud Development Kit, you'll need to add a new
AWS::Serverless::Functionstanza to yourtemplate.yamlfile. - If you're using Serverless, you'll want to add a function to the
functionsarray in yourserverless.yaml.
Whatever framework you use, you'll need to create a new path in your API that serves this webhook. Our webhook requests are HTTP POSTs so that's the only method that you need to support. Depending on the language you choose, you'll need to configure this to use the appropriate AWS Lambda runtime:
- C# (.NET): tested on the
dotnet6Lambda runtime - Node: tested on
nodejs16.x - Python: tested on
python3.9 - Ruby: tested on
ruby2.7
Configure the Required Permissions for the Webhook Lambda Function
You'll also need to write a policy document to grant permissions to the Lambda function so that it's allowed to interact with the API Gateway data. Depending on the framework you use, this may need to be written in JSON or YAML.
If you are not using the webhook to automatically provision new API users, you can attach this policy to the Lambda function:
{
  "Sid": "APIGatewayReadPolicy",
  "Effect": "Allow",
  "Action": ["apigateway:GET"],
  "Resource": ["arn:aws:apigateway:*::/apikeys", "arn:aws:apigateway:*::/apikeys/*"]
}
- Statement:
- Sid: APIGatewayReadWritePolicy
Effect: Allow
Action:
- 'apigateway:GET'
Resource:
- 'arn:aws:apigateway:*::/apikeys'
- 'arn:aws:apigateway:*::/apikeys/*'If you are using the webhook to provision new API Gateway tokens, you will need to use this policy:
{
  "Sid": "APIGatewayReadPolicy",
  "Effect": "Allow",
  "Action": ["apigateway:GET", "apigateway:POST", "apigateway:PUT"],
  "Resource": [
    "arn:aws:apigateway:*::/apikeys",
    "arn:aws:apigateway:*::/apikeys/*",
    "arn:aws:apigateway:*::/usageplans/*/keys",
    "arn:aws:apigateway:*::/tags/*"
  ]
}
- Statement:
- Sid: APIGatewayReadPolicy
Effect: Allow
Action:
- 'apigateway:GET'
Resource:
- 'arn:aws:apigateway:*::/apikeys'
- 'arn:aws:apigateway:*::/apikeys/*'
- 'arn:aws:apigateway:*::/usageplans/*/keys'
- 'arn:aws:apigateway:*::/tags/*'Configuring in ReadMe & Testing
Under Configuration > Personalized Docs in your project dashboard, you will be able to test your Personalized Docs Webhook and save it to your project. Once everything is working, ReadMe will make the request to this endpoint every time a user logs into your ReadMe docs.
For customers on our Enterprise plan, you can configure your Personalized Docs Webhook in the Enterprise dashboard in the End Users section.
To use this Personalized Docs Webhook to set up the Getting Started and Authentication pages in your developer hub where your developers will be able to locate their API keys and make sample requests, head to this page.
Updated 5 months ago